Friday, July 28, 2023

Section 8 Begins: The Horizontal Stabilizer

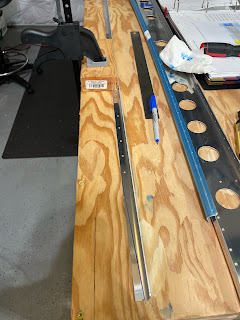
 Now that we have finally completed the rudder, we are onto the next section.  This section, the Horizontal Stabilizer is much bigger than past sections we have worked on.  I had to run down to my storage unit to pickup the pieces, and I ended up having to get creative.  If you plan to put your parts into storage like me, I recommend trying to keep the longer parts at home, it's just easier than getting back and forth.  Smaller things like tail cone parts, skins, and other pieces are easier to transport.

The HS Spars are a bit long....

Despite the creative method to get parts home, I was ready to go and didn't wait long.  We reorganized my workbenches into a lengthwise arrangement and got to work cleaning up a bit.  It's amazing how much dust, debris, and other crap gets stuck under the tables when they aren't moved for a while.  It was nice cleaning up the garage before moving on.  The first page had me getting the doubler setup and the spar match drilled.  It was extremely straightforward and didn't require any heavy lifting. 

Match drilling the Horizontal Spar

After doing this, it wanted me to disassemble, prime and rivet.  It is a tiny batch of parts and I didn't want to bust out my priming setup for nothing.  The next page had me cutting down the spar caps, stringers, and the doubler for the other spar.  I decided to move onto this section and prep all of these parts.  This would give me a larger batch of parts to prime at once.  The parts weren't hard to cut down, it was similar to the same thing I did on the Vertical Stabilizer spar.  


I also got to do my first bearing of the project.  This was pretty straightforward and explained well.  It had me cleco the sections together and then rivet everything together.  It required me to clamp the parts down to avoid any warping.  The flange parts are all done and ready to get mounted after priming.

Completed Flange Bearing

Next week I will complete deburring the stringers and spar caps.  Then we will be ready to prime everything together and get to riveting.  This part should move quickly and once I have the priming done, we will get to assembling everything.  Also on my list of things to do is a trip to Lowe's.  I need to pick up some wood to make the stands for assembling the Horizontal Stabilizer.

The "Before" Picture.... The End to come in a few updates.


Wednesday, July 12, 2023

Section 7 : Complete!

It's crazy to think that only a year ago I started this process of building.  Despite some breaks in progress for work, family, and other things, I am amazed that we have completed two sections at this point.  Now that we have finalized much of the "Workshop" setup, Storage arrangements, and time allocation, its time to get the ball rolling.

So back to the headline, the Rudder is done!  We last left off where we completed the trailing edge, mounted the counterweight, and now we finished the leading edge.  The leading edge is where the two skins are rolled together to allow the rudder to maintain its aerodynamic efficiency.  Section 5 which describes many of the basic techniques that are used in the build has a rather small paragraph about how to roll the skins together.  It essentially says to duct tape the skin to a pipe, roll downwards, and keep pressure on the spar.  After making the basic roll, you manipulate the skin to finish the roll.  After rolling it, you match drill the holes, debur, and rivet together.  It really makes it sound extremely simple, but I didn't find it as such,

Rolled Leading Edge Section

The RV-10 directions describe this step pretty simply, by telling you to do it in sections and use a 1.25" pipe.  That was about all the notes it provided.  When we did this at Synergy, it was on a small test kit which used a small broom stick.  It was all the same chord and didn't variate along he spar in width, the RV-10 spar varies along the length.  So suffice to say the practice kit wasn't as realistic as I would of hoped.   I tried the tape with a pipe, used a broom, and than man handled it a bit.  It ended up coming out pretty decently, and I was able to cleco the skins together.  I let them all sit for a little while in the form of the rolled joint, and then drilled them.  It was definitely not as simple or smooth as I would of expected based on some feedback online. 


Rolled Leading Edge With Cleco's


After riveting everything together, it was off to the races to clean up the skin.  I quickly wiped down all of the surfaces with some acetone to remove any oils before storage.  The Rudder is now moved into storage along with its counterpart, the Vertical Stabilizer.  I also removed the Horizontal Stabilizer parts from storage.  It was quite interesting since the Horizontal Stabilizer spars are significantly longer than the parts I have dealt with so far.  I ended up having to put them through the rear window of my pickup truck and hold onto them for the short ride home.  After some redesign of my workspace and cleanup, we are prepped to get ready to go on the horizontal stabilizer in the coming days.


Horizontal Stab Spar Ready To Go


Thursday, July 6, 2023

Chapter 528 2023 Meeting

 So I definitely wish my EAA chapter was more active like I hear other ones are.  My chapter hasn't met for quite some time.  It's really disappointing to me as I want to get to know these guys and hopefully have them come assist or give me tips on my build.  Many of the people who come to the meetings I am finding are not actually builders, but many have bought completed RV's or other homebuilts.  You hear lots of chatter about people needing an A and P or looking for someone to look over the plane.  There is one person who is kind of the tech counselor, he is actually the RV-10 owner thats local, so that is a great benefit as a resource.  The other person who runs the chapter built and RV-7 and had built another early generation RV years ago.  So I am hoping to get these two to be more involved and lend a hand at times.

So we met up at the hangars out at FOK last month and got to chat and relax awhile.  A builder who is just about done with his Sonex showed off his build.  His build just did Taxi testing and is doing some final cowl work now.  He is excited to get that process going.

Another person I met was someone building an RV-12 based out at Mattituck.  He's a retired career helicopter pilot between the military and police department who is now enjoying the extra free time he has.  He's been making good progress on his kit and has a lot of the parts on hand so he isn't being delayed by much.  I am eager to see how his build progresses and hope we end up visiting him later this summer and seeing his project.

NY, especially downstate, has a serious problem with hangar availability and the cost of that.  Between the efforts to close the East Hampton airport, and the serious influx of traffic, the hangars are hard to find.  The guy building the Sonex was on the waitlist for 5 years before he finally got offered one.  I guess I need to get on the list, but I don't want to get a call and be unprepared.  

We all had a nice afternoon and had some pizza over our plane chatter. I am hoping that COVID is now over, we will meet a little more often and the guys who are actively or have previously built will get a bit more hands on with helping or pointing me in the right direction.  I really want some extra eyes to give me tips, feedback, and insure I am moving in the right direction before I get into the really big and expensive pieces.

Rudder Trailing Edge and Counterweight Completed!

 So June was quite the whirlwind.  Between school wrapping up for the year, the kids being home part of the month, and work being extremely busy with summer travel starting, there was just not much time to build and keep my sanity.  I ended up taking much of the month off to spend time with the kids and focus on the things that needed the most attention.  Finally, after some time away and finding a free moment, I finally got to the trailing edge of the rudder this week.

Backriveting the trailing edge

My Cleaveland Tool kit had a squeezer attachment for the trailing edge included in it. I've heard some mixed opinions about the tool from the forums and other builders online, but I wanted to give it a shot myself.  I took the first rivet and tested using the squeezer attachment only and wasn't 100% happy with the result.  So I then went to the old fashioned method which was taught in the Synergy class and riveted with the mushroom set on some steel angle.  The steel angle made it easy as I didn't need to constantly reposition the rudder assembly over the small backrivet plate.  This allowed me to basically do one entire half at a time.  

Squeezing a few of the rivets that needed it at the end.

So my final setup to do this was the angle iron of steel on the table edge, the rudder over that, and then my wood and block on top to hold the rudder down.  This worked really well and I had mostly great results.  When I finished the normal back riveting, I noticed a few had a little proudness on the shop head, so I squeezed those and it finished setting them perfectly into the dimples.  So I think the final result was a hybrid of backriveting first and then squeezing to clean up the final result.  This seemed to be the best result, and sounded pretty much like what Austin did from Youtube.  

After taking on the trailing edge, I moved onto the rudder counterbalance arm.  This involved installing a counter weight, drilling my first nutplate, bending the skin to cover it, and then final assembly.  The directions spell out the method pretty well, but it takes a little finesse.  I bent the skin like it said, clamped the wood on it, and did the hammer method.  I wasn't thrilled with how many hits it took to get the bend desired, but it stated an 85% bend in the manual.  I got about there and then started working on the final bend and nutplates.  Using the screws to dimple the skin for drilling was a simple process that is pretty smart when you think about it.  I made the drill holes and dimpled everything up.  After I figured out how to drill the nutplate, it was smooth sailing.  Overall, I am happy with the final result, I am not sure if I should of made the skin a bit tighter to the weight, but I guess I'll find out down the road at final assembly.

Bending the skin around the Counterbalance Weight


Hammering the skin crease in.


After I finished the counter weight skin, it was time to roll the leading edge, the last step of the Rudder assembly.  Section 5 calls out for a 1 inch pipe, but the RV-10 manual says use a 1.25 inch pipe.  So a trip to Lowes was in order to get the correct pipe.  My reading, Youtube review, and other resources all have very mixed opinions on the pipe size and method.  I have seen some use clecos, some use duct tape, and others use brute force to get the roll.  It's not the most simplistic idea when looking at it, but I am sure I will figure it out.  So off to Lowes and then we will close out the Rudder for good.

Friday, June 2, 2023

Rudder Spar Complete

 So there was a small break in building to allow for some family time.  The family and I visited one of our most favorite places, the Walt Disney World resort.  After a nice week away and lots of great memories, it was time to return home.

After getting back, I immediately got back to finishing up the spar.  I started riveting the rudder spar to the skin and realized that the 3" yoke on my squeezer wasn't going to cut it.   I was happy with the results of the squeezed rivets so I returned to my trusty Cleaveland Tool for a new 4" yoke.  It took a few days to come in, but I was ready to go.   I finished up the spar rivets and everything turned out great.


After the spar was complete, it was time to tackle the counterweight ribs and skins.  I set the pop rivets and set the first two skins and realized there was an issue.  I noticed a gap in between the skin and rib that was ever so slight.  I wasn't happy and realized something wasn't right.  I took a look and phoned a friend, (Thanks Christine, AKA Plane Lady) for realizing my error.  Sometimes when you are looking at something for long enough, you tend to just not notice the small nuances.  I somehow missed the holes on the side of the counterbalance rib, and never dimpled them during the prep phase.  Once we figured it out, I was honestly mad at myself for such a simple mistake.  But it shows the humanity of a homebuilt and truly teaches a lesson.  I had to drill out the few rivets I already set, and then drill out the two pull rivets holding the rib to the spar.  I had not done this before, so a review of section 5 and a trip to the hardware store for a punch resulted in a perfect outcome.

Original Set, Notice The Small Gap....

I got everything dimpled and cleaned up after it was removed.  This then allowed me to reset everything cleanly without any damage.  The second time, the skin was nice and tight to the rib and looked much better.  I know am ready to rivet the trailing edge.

All Fixed and Skin Tight.


Friday, April 14, 2023

Stiffeners Riveted and Trailing Edge Work

 The last month has been a bit busy with school breaks and getting the house ready for spring.  Lots of yard cleanup, Easter, and the kids being off have slowed down my time.  I finally got around to back riveting for the first time on the plane.  I utilized my two backing mats and put the back rivet plate between them.  This kept the parts at a good height without any major bend going over the side.  I see why some people like having a bigger plate or sink it into their table, but I think the ability to move the plate is more beneficial.  I noticed as you got to the ends of rudder skins, it was beneficial to just slide the plate down the table instead of the part.  Otherwise, you have a huge section hanging off the end.  Back riveting was pretty straight forward.


After I finished the back riveting I was rather impressed with how everything looked.  Time to start prepping for sealing and rivet the bottom rudder horn into place.  I took the recommendation of many people and ended using a pull rivet for the very last hole on the training edge of the horn.  It was way too tight and I tried more than once to buck and indirect rivet it with terrible results.  That was just way too tight a spot and I didn't want to slaughter the horn itself beating on it with the rivet gun.


After some time away from the project for the housework and the lack of a second set of hands, I finally got my father to come over.  He was going to be my second set of hands to hold the rudder skin while I joined them together.  The directions were pretty clear in describing the process, and we read through it a few times.  I ordered the cartridge style proseal figuring that one would be the perfect amount to utilize, but mixing that thing was a royal pain!  It took forever it felt like to mix thoroughly through using the little dowel and mixer in the cartridge.  After what felt like an eternity, we were ready to rock and roll.

Setting Pop Rivets in the stiffeners


I started with joining the base as instructed and pop riveted the first stiffeners.  Its pretty tight without severely bending the skin back, so it was easier to use a manual pull riveter.  I was really careful and layered the proseal as thinly as I could per the directions.  I tried to use a little roller at first, but that just gummed up and didn't do anything.  I ended up using a few popsicle sticks which I stole from my daughters craft bin.  That worked well and I had one which was snapped in half, so the pointed end was great to get into the tight corner against the skin.  After a long session of cleco's and pop riveting, the skins were joined and the trailing edge sealed.  

Trailing edge secured and curing

I utilized a technique that my Technical Advisor has suggested and others I have seen do online.  This was to go purchase a piece of aluminum angle iron.  This is a great and thicker straight edge which I used to support the trailing edge.  I utilized one rudder skin and marked all the holes and drilled the angle iron.  Afterwards, I deburred it and checked it to make sure everything matched.  This gave me a straight and stable edge to cleco the entire trailing edge to while I prosealed it.  Upon completion, I had it completely clecod to the angle iron and left it to cure for a few days.

The kids have been off this past week so no work has been done.  It was a good time to let the edge cure and solidify before I start cleaning out the holes.  Next week I will clear out everything and get to finishing up the rudder.  I'm hoping I can finish the rudder up before my trip next month, and then I will jump right into the Horizontal Stabilizer upon getting back.


Thursday, March 9, 2023

Trailing Edge Cleaned

 So the kids were off from school for a few days and things have been hectic at work.  I finally got around to removing the primer from the trailing edge area of the rudder skins.  A little MEK, a rag, and some elbow grease and it took about an hour to do.  I will definitely not make that mistake on future parts because I don't want to deal with that again.  Now to start back riveting this coming week!

Airventure 2024 Recap

 So Airventure just passed and the annual pilgrimage to Osh Kosh has ended.  They reported over 13,000 aircraft operations over the course o...